Tools and finishing
Airbrush vs Spray Can
Quick answer
An airbrush is the only practical way to paint a locomotive body evenly, and most modelers do not need one for basic structure or detail painting. A rattle can sprays a fixed pattern with no control over thickness; the Timbertech Airbrush Kit with Compressor Dual Action Gravity Feed gives thin, even coats a can cannot, at the cost of a compressor and cleanup.
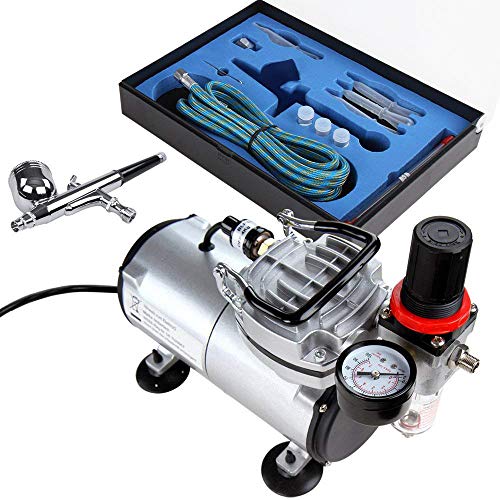
Timbertech Airbrush Kit with Compressor Dual Action Gravity Feed
$75.99A compressor and airbrush give thin, even, controllable coats, the only practical way to paint a whole locomotive body evenly.
Best for: a first airbrush for painting locomotives and structures
Check price on Amazon
Testors 9146XT Enamel Paint Set
$20.00A bottled brush paint set needs no compressor and no cleanup routine, the right choice for small detail work and occasional structure painting.
Best for: brush painting structures and details
Check price on AmazonAn airbrush wins outright for one specific job: painting a locomotive body or a large structure surface in thin, even coats with real control over pattern and pressure. Nothing else, brush or can, reproduces that result reliably. That does not mean everyone building a layout needs one. If your painting is limited to a few structure kits, a rattle can and a bottled brush paint set like Testors 9146XT Enamel Paint Set cover the job at a fraction of the cost and none of the setup.
The honest dividing line is scope and frequency, not skill level. A single structure kit, painted once, does not justify a compressor. A roster of locomotives, a fleet of freight cars needing a factory-matched repaint, or any project where an even, controllable coat matters more than convenience, does.
On this page
- Why is an airbrush the only real option for a locomotive body?
- Who genuinely does not need an airbrush?
- What does a rattle can actually get right that an airbrush does not?
- Airbrush vs spray can vs basic brush paint, side by side
- Is enamel or acrylic paint the bigger decision once you have chosen a method?
Why is an airbrush the only real option for a locomotive body?
A locomotive shell is a large, continuous curved and flat surface, and any visible brush stroke or uneven buildup at an edge or panel line stands out immediately under normal room lighting. A brush leaves texture no matter how careful the painter is. A rattle can sprays a fixed, usually wide pattern with no control over how thin or how targeted the coat is, and masking a rattle can cleanly for a two-tone paint scheme is genuinely difficult. An airbrush like the Timbertech Airbrush Kit with Compressor Dual Action Gravity Feed lets you thin the paint, adjust the spray pattern and control the air pressure, building up thin coats that dry even and masking cleanly along a hard line, which is exactly what a locomotive body, a passenger car roof, or a large scenery backdrop actually needs.
Who genuinely does not need an airbrush?
Anyone whose painting is limited to a handful of structure kits, small detail parts, or occasional touch-up work. A bottled enamel set such as Testors 9146XT Enamel Paint Set brushes on smoothly with no compressor, no cleanup routine beyond a jar of thinner, and no learning curve beyond basic brush control. If the whole project is painting doors, window frames and roof details on a few Cornerstone structure kits, a compressor and airbrush add cost and setup time without adding a visible benefit, since a careful brush hand disappears into small detail work the way it never does across a large locomotive shell.
What does a rattle can actually get right that an airbrush does not?
Speed and zero setup. A hardware store spray can, such as a rattle can enamel or a hobby-specific spray primer, needs no compressor, no cup cleaning and no thinning ratio to get right, and it lays down a usable coat in minutes for a project where perfect evenness is not the priority, like priming a structure before detail painting or coating a large flat scenic base. The tradeoff is exactly the control an airbrush offers: a rattle can sprays whatever pattern the nozzle is built for, wide and hard to focus, and building thin, even coats or masking a sharp two-tone line is much harder to pull off well.
Airbrush vs spray can vs basic brush paint, side by side
An airbrush is the only method that gives even, controllable coats across a large locomotive body; a rattle can is faster but sprays a fixed pattern.
| Method | Best for | Setup and cleanup |
|---|---|---|
| Airbrush | Locomotive bodies, large even coats, two-tone masking | Compressor, thinning, cup and hose cleaning |
| Rattle can | Priming, quick large-area coats, no fine control needed | None, but no thinning control either |
| Bottled brush paint | Structure kits, small detail work, touch-ups | A jar of thinner and a rinsed brush |
Is enamel or acrylic paint the bigger decision once you have chosen a method?
It is a separate decision from airbrush versus can, and it matters for both. Enamel, like the paint in Testors 9146XT Enamel Paint Set, brushes more smoothly and dries into a more durable, handled-friendly finish, but it needs solvent for cleanup and proper ventilation while working. Acrylic cleans up with water and has largely displaced enamel for airbrush work because it does not require the same solvent thinning, though it can be less forgiving of brush strokes. See best airbrushes for model trains and best model train paint for the fuller product lineup on both sides of this choice.
Sources
- Timbertech and Testors published product specifications
Frequently asked questions
Do I need an airbrush to paint a structure kit?
No. A structure kit is made up mostly of small, separated surfaces, doors, trim and detail parts, where a careful brush hand with a bottled paint set produces a fine result. An airbrush earns its cost on large, continuous surfaces like a locomotive shell, where brush strokes are far more visible.
Can a rattle can paint a locomotive body well?
It can produce a usable single-color coat, but a rattle can sprays a fixed, usually wide pattern with no control over thickness, and masking it cleanly for a two-tone scheme is difficult. For a factory-quality even finish and a sharp masked line, an airbrush remains the more reliable tool.
What compressor do I need for a first airbrush?
A small, quiet compressor built specifically for hobby airbrushing, often bundled with the airbrush itself in a starter kit, is enough for model railroad work. Model painting does not need the higher output a full size automotive spray gun requires, so an inexpensive hobby-grade compressor is the right starting point.
Is acrylic or enamel paint better for an airbrush?
Acrylic has become the more common choice for airbrush work because it cleans up with water rather than solvent, though it needs the right thinner ratio to spray well through a fine nozzle. Enamel still airbrushes fine and dries into a durable finish, but it needs solvent-based cleanup and good ventilation.
How do I clean an airbrush after use?
Flush the cup and nozzle with the appropriate thinner or water for the paint used, disassemble the needle and nozzle per the manufacturer instructions, and wipe down the parts before paint fully dries inside them. Skipping cleanup is the most common reason a hobby airbrush starts spitting or clogging after a few uses.
Is a rattle can primer a good first step before airbrushing?
Yes, a rattle can primer coat is a fast, even way to get a uniform base color and surface before switching to an airbrush for the final color coats and detail work. It saves airbrush time on a step where a can's wider spray pattern is not a disadvantage.
Researched, not professional advice. This page is compiled from published manufacturer specifications, instruction manuals, published NMRA standards and recommended practices, and owner-review consensus, not hands-on testing. Figures described as a rule of thumb are hobby convention rather than a standard, and they are labelled that way wherever they appear. Always check a radius, a clearance or a grade against your own equipment before you cut wood or lay rail, because manufacturers vary and so does what your specific models will tolerate. Any permanent mains wiring in a layout room is work for a licensed electrician to your local code.